Sunday, October 23, 2011

what was in the box?

?????????????????????????????
?????????????????????????????


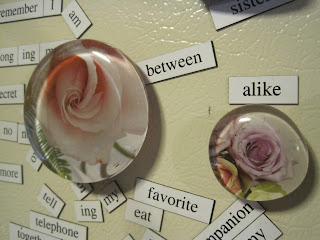
magnets!  that i made! 

this is a project that was first inspired in Seattle when i was with Amanda.  i bought a glass magnet that was of Seattle on a city map.  after i bought it i was looking at it and decided that i could definitely make it myself.  first, i had to buy the glass gems.  the best place i found to get them was craft warehouse.  they have a very large choice of sizes and come in large packs of just clear (not colored or iridescent).  the 1" glass gems are usually $3.99, but seem to go on sale a lot.  craft warehouse actually had the same project in mind that i did and even had a little section in craft warehouse with examples of how to make the magents. 

supplies to make magnets:


  • clear, non-iridescent glass gems
  • mod podge
  • magnets
  • magazines or whatever! 
  • 1" circle punch optional
  • glue


i have hundreds of magazines around because i like to decoupage, so i had plenty of pages to flip through to look for cool pictures to use.  i have lots of other ideas about what to use besides magazine clipping - there are so many possibilities.  i think my next project is going to be making "dorky" magnets using pictures from old textbooks that i have of different types of white blood cells and parasites (i'm going to scan the pages so that i don't ruin the book!).  to make the magnet, i brush a thin layer of mod podge on the back of the glass gem, and place a pre-cut out 1" paper circle (or whatever size glass gem you have) on the back.  after it's placed it might need to be trimmed if it's not perfect because each glass gem is unique. next, i used a glue gun to attach a magnet to the back.   


i just used medium strength magnets like these.  they are strong enough to hold up the 1" glass jem plus 1-2 pieces of paper.  as you can see i also made some larger magnets (2.5" diameter).  this was where i ran into some problems.  first, the medium strength magnets are barely strong enough to hold up just the glass gem and definitely not any paper.  so i had to go back to the craft store to look for stronger magnets.  i found some but they only come in packs of 4 so they are a lot more expensive per magnet.  the magnets were very strong and able to hold up the larger glass gem and multiple pieces of paper.  i was pleased, but then...two of my strong magnets stuck together and when i went to pull them apart, they were so strong that instead of coming apart, it pulled the paper off of the glass gem.  so i have learned to remove magnets with a sliding motion and not pull directly out.  finally, one day, the glass gem just fell off the fridge, leaving the magnet behind.  the stronger magnets are a smooth metal so the glue gun doesn't have any pores to attatch to and the two smooth surfaces do not stick very well.  so i'm still working out the kinks with the larger, heavier glass gems.  i'm also thinking i will need to start buying supplies in bulk on-line to cut costs. 

overall, i'm very pleased with the result and i love making these little "gems".  the problem is, i have about 100 new magnets.  i'm going to have to start giving them away to more friends

Wednesday, October 19, 2011

inspiration

coming to you from pullman

i wish this sentiment was more intuitive to me.  this quote has definitely given me something to think about.  words stolen from Elise Blaha
3 days into surgery block...inspirational paper chain reminding me of the bigger picture.

Thursday, October 13, 2011

Halloween Fun

Coming to you from Portland


I am not actually going to be a bumblebee for Halloween, but I bought an outfit for Barley and I had a costume from three years ago, so we modeled together.  As you can see, she absolutely hates it.


These are the cutest things I have ever seen.  I got the idea from this years Martha Halloween issue.  All you do is print off the templates for the mouths from the Martha website, trace it onto the pumpkin and saw it out.  Remove the insides, pop in some fangs and add a couple of red push pins for eyes.  I bought the fangs for $1 each at Party City, but I later saw some at Spirit that were 10 for $3.  I got the push pins at Craft Warehouse for $3 for a variety pack of 100.  The pumpkins were 50 cents each, so a very cheap project overall.  Unfortunatly (I'm sure as a way of getting back at me for the bumblebee outfit) Barley got a hold of the little white one and tore its fangs out and started chewing up its flesh.  


This mummy pumpkin was really simple.  You just make a couple of holes for eyes and push white push pins in and draw in some black pupils with a sharpie.  Then using crepe paper ($1 at Party City) wrap the pumpkin all around, using double sided tape when necessary to hold it down.


These are fabulous and only cost me $1 (for the orange tissue paper).  This is from Woman's Day Halloween issue.  You just cut a bunch of one inch strips of orange or white tissue and use glue water (one part wet glue, one part water) to paint them onto a pickle jar.  Then you cut out faces from two layers of black tissue and paint them on.  Once they have dried, go over everything with Mod Podge for a glossy finish.  This may cost a little more if you don't have black tissue or Mod Podge which I already happened to have.

Tuesday, October 11, 2011

master procrastinator

coming to you from pullman

sometimes, i'm a creative or productive procrastinator, like i will cook or be crafty, or clean, or walk ellie; other times i will be a very uncreative procrastinator and just watch tv or lose hours on the internet.  today, was a productive procrastination day.  this was my 30 minute procrastination project for the evening.

first, i decided that i wanted to make a paper countdown chain for Thanksgiving break.  i decided that i would use some of my scrapbooking paper - that's more fun than just regular construction paper.  then i thought i might get extra creative and put little inspirational sayings on the back of each one to get me through the next 80 days.  here's what happened
  • i figured out how many days until Thanksgiving break using this website (it's just so much easier)=38 days
  • i googled "inspirational quotes" and found this website, which i really like, because it has a variety of quotes organized into many categories that will be helpful getting me through surgery block (particularly inspirational, motivational, happiness, fear of failure, don't worry, and success quotes).  you could probably get really creative with what you put on the back of each link, but since this was only a 30 minute project, i opted to go the copy & paste route.
  • i copy and pasted 38 of these quotes into a word document and formatted them to be about 1" apart from each other (in home tab, went to 'paragraph' then under spacing>after, chose 60 pt), which came out to 7 pages. 
  • i picked out some 7 pages of fall-looking paper and cut it to 8.5"x11" sheets
  • next i printed the quotes onto the white side of the paper (figuring out how to do this on the printer took me quite a few tries for some reason.)
  • then, i cut my paper into about 1" strips.  sometimes they turned out bigger if there was a really long quote
  •  finally, i stapled them into a chain.  i'm a big fan of stapling to make paper chains instead of gluing.  i remember when i was little, we would make paper chains to countdown to christmas and we would connect each link using paper cement.  i can hardly believe that i had the patience for this as a child; i certainly don't have the patience for it now, especially since it's something that i'm going to be tearing apart soon.
  • ...and hung it on the wall!  my cats will probably have it down by the time i get home from school tomorrow, but i think it's the thought that counts.
so there you have it!  a 30 minute procrastination project.  well, not all of those 30 minutes were next to each other, but you get the idea.  how do you procrastinate?  (not that i need ideas)

i think it's about time for a post from julie, so i'm going to cool it and be inspired by my new inspirational paper chain to study diligently and focus on surgery block for a few weeks.  i have surgery block starting next weeks for two weeks, then one week off, then one more week on.  hopefully, i won't be too crafty while i'm away.  either that, or i'll have a lot to blog about when i return from my hiatus. and some exciting news, p-town sisters might actually be in the same town soon!

Sunday, October 9, 2011

To-Do List Champion

coming to you from pullman

this weekend feels super unproductive, because I didn't really get much studying done.  I was working diligently on my to-do list however...and watching Mad Men episodes.  I actually really like making lists and I don't really know how I would get anything done without them.  Amanda got me this amazing book to make lists in
  
I saw some other books like this at Paper Source in Portland on 23rd St (lovelovelove this store).  Those pages are from the lists "Bad things you did as a kid" and "Most memorable friends from you past."  Anyway, I was going to tell you everything that I got done on my to-do list, but when I wrote it down, the list seemed short, so I will tell you about a couple of crafty things that I did.  I made this card
Will this be my "signature"?  I'm feeling it out.
I don't find that there is any one approach to making cards.  I really just get out every single art supply that I have and hopefully something comes to me.  Things that are good to have:
  • Cardstock for the actual card part
  • ribbon is always good to have
  • Inspiration from google searches or from cards at the store.
You just have to go for it and see what works and what doesn't.  Here are some Valentine's Day cards that I made for V-Day 2011.
 
I create a similar sized mess to when I "minibook", but since my last minibook event, I have made some changes to my art supplies organization system so that I can go from this...to this in under 5 minutes.  My paper bins are organized into scrapbooking paper pads, scrapbooking paper pre-cut into 5x7 rectangles, miscellaneous paper scraps, magazine clippings, & stickers.  I have one big bin that holds all the supplies that I use the most and a smaller bin that hold all of my stamps and ink pads.  Other bins contain miscellaneous art supplies that I do not use as often.  This has made crafting so much easier.  Someday, it would be nice to have a table set aside for projects like this so that all of my supplies were within reach and I would not have to move them around. 
 
 My other project is secret - to be revealed once this package makes its way to Amanda.  This package will be en route to the greater Seattle area starting tomorrow.
Listening to
Something Borrowed soundtrack
Life As We Know It soundtrack
Say You Like Me by We the Kings 

Watching
Psych Season 5 (season 6 premieres October 12th!)
Mad Men (I'm trying to make it to Season 4, because Matt Long is in 7 episodes.)
Bend it Like Beckham has been moved to the top of my Netflix queue, because there was a trivia question at trivia night on Tuesday about this movie, and although I got it right - and was one of the only questions we got right in that category - everyone was appalled that I hadn't seen it. 

Tuesday, October 4, 2011

nuts!

coming to you from pullman

do you have too many nuts around?  i do.  i thought i was going on a health kick a while back, but it turns out i just don't really like raw nuts.  so i have all these nuts now.  i do eat them, just VERY slowly.  my daily nut intake is pretty low.  these are my nuts...


so, i decided that i would look up some recipes online (googled it!) to use up these nuts.  today, i tried my first recipe out. 

Easy Seasoned Pecans
  • 5 tablespoons plus 1 teaspoon butter, melted
  • 4 cups pecan halves 
  • 1 teaspoon seasoning blend with salt, pepper, onion powder, and garlic powder (Cajun seasoning or seasoned salt blend)
Preparation: pour melted butter over pecans and stir.  Roast in oven for 15 minutes at 325 degrees stirring occasionally.  Sprinkle with seasoning and toast for another 15 minutes stirring occasionally.

Food safety note from me: at the link above, recipe writer says prepared pecans can be stored at room temperature for up to 1 month, but they should probably be kept in the fridge (make sure to eat a couple right away because they are good warm).  actually, all nuts are "supposed" to be refrigerated after the packaging is opened, but these nuts especially since they have been "tampered" with.  here is where i get all of my food storage information.  i'm pretty sure few people follow all of these suggestions, but it's a good resource to have if you are feeding children or the immunocompromised. 


i halved the recipe because i wanted to try it out first.  i also lowered the toasting time to 10 minutes when i put them back in, because some of the pecans were starting to look extra crispy. additionally, i am certain that i put way to much seasoning on them. i freestyled it, which was my biggest mistake.  they are flavor-packed however i think it is supposed to be more of a subtle complement to the pecan.  they are a lot more "snacky" now, but i'm not sure how much of the health factor was lost during this process, especially since "snacky" nuts predisposes to eating more than a serving.  i also think that i like the idea of roasting nuts whether i put butter and seasoning on them or not.  a quick google search and some skimming suggested that roasting nuts could make the protein more available to digest (raw nuts supposedly contain "anti-vitamins" that inhibit digestion) but further skimming revealed that the roasting also destroys certain vitamins so who knows?.  ...also, it made my house smell really good.  overall, this made my pecans more edible for me. 

nuts = a good source of protein for poor college students who don't buy a lot of meat and a good source of "healthy fat" if you can contain yourself to one serving.